Preferably, you should have some kind of general experience of programming languages.
And a damn fine cup of hot, black coffee.
Glǽmscribe’s engine concepts
Before beginning to write a mode for Glǽmscribe, you should have a basic knowledge of its architecture and how the transcription engine works.
The engine consists of three chained modules applied consecutively on the transcription string:
- The preprocessor, which is used for disambiguating the text to transcribe.
- The processor, which does the main transcription job on the preprocessor output.
- The postprocessor, which is used for formatting purposes of the processor output.
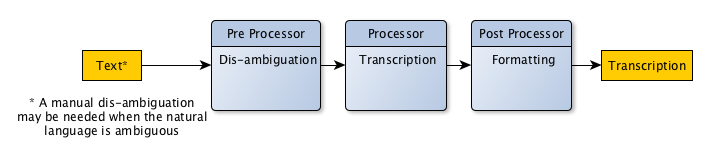
The preprocessor and postprocessor have different purposes but do work the same way. The behaviour is pretty simple: each mode will define a sequence of zero or more simple atomic directives to apply to the transcription string.
Typical directives for the preprocessor are 'put everything downcase', 'do a simple substitution', 'apply a regexp', and so on. They can help to easily disambiguate the given input string. As concrete cases, we can cite the following examples of application among others:
- Simplifying the input string case – all tengwar modes work downcase, so it is far easier to start the transcription by putting everything downcase so that we can simplify the implementation of the rules of the processor.
- Disambiguating long vowels – by replacing all variants of long vowels to a unique one. E.g. most of our tengwar modes replace ā, â, aä, äa, ää, aa by á so that the processor implementation is simpler too.
- Make a preprocessing on elvish numbers (base conversion, digit order inversion, ...).
- Prepare the string when dealing with complex tehtar positioning.
- And so on.
Typical directives for the postprocessor are not numerous. Currently we have only one case: reversing the letter order in sarati modes written from right to left.
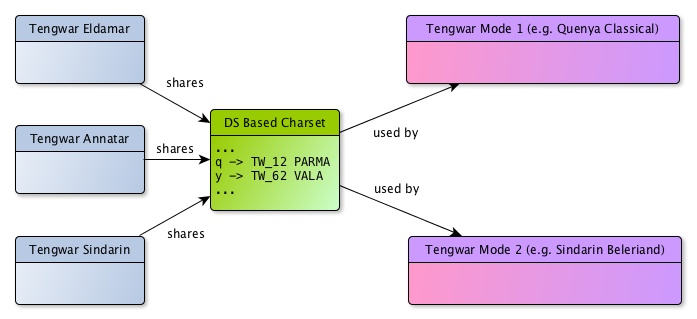
The final output of the engine get its characters from a character set which may have various historical origins and thus might not be very strictly defined.
Typically, a mode that would transcribe an Old Norse text written in the Latin alphabet to runes would use the runic Unicode charset range as an output charset which thus is well normalized.
On the contrary, the problematics for Tolkien languages are quite complicated; there is no Unicode range or norm defined for describing Tolkien’s writing characters and symbols (even if there have been works and studies for that purpose), and generally speaking, our references are the charsets defined by Dan Smith in his Tolkienian fonts. These fonts are quite old now and were designed at a time where computers would not offer many of the features we have today. For instance, they aimed at simplifying the keyboard input of characters by geographically mapping Tolkien’s tables on a QWERTY keyboard. Also, because at the time of creation of these fonts OpenType features were not supported by word processing sotfwares, diacritic signs – which are many in Tolkien’s writing systems – exist in these fonts under several variants, and the user has to chose between those variants depending on the preceding letter.
These considerations motivated the choice of isolating as much as possible the issues linked to charsets from the transcription logics. Even if that aim cannot be totally fulfilled till we have clean Unicode, normalized, OpenType fonts, it will still be far easier, with the effort that has been done here, to port the modes and make them evolve.
This isolation is done by having independent charset files that describe the characters of the charset by giving them names. For example, in Dan Smith’s fonts, the tengwa parma is found at the place for the letter p (Unicode position 0x71) and the tengwa vala is found at the place for the letter y (Unicode position 0x79).
The mode files will point to charset files, telling that they are compatible with these charsets, and use the names of the characters given in the charset files. In that way the mode files are far easier and more logical to read, and far easier to port to other charsets. Of course, this also makes charsets sharable between modes and fonts. It could be summarized by the following scheme (fonts in blue, charsets in green and modes in violet).
The processor uses a transcription tree built from context-free rules with the following principles:
- The transcription tree is made of nodes that can be effective or non effective.
- A node is always linked to one and only one character from the input character set.
- If a node is effective, it contains an output sequence that represents the transcription of the path that leads to the node.
- If it is non effective, it is simply a transition node that is a link in the path leading to an effective node.
- Terminal nodes are always effective, non terminal nodes can be effective or non effective.
The transcription algorithm works with the following principles:
- It transcribes a text word by word.
- Given the current position in the current word, it will explore the tree to find the longest matching path leading to an effective node. If found it will eat the explored path, and output the sequence associated to the effective node. If not found, it will output the not-found character (☠) and eat one letter.
- Repeat the precedent point until there is nothing left to eat in the word.
Let us have a look at the following example. The tree is completely fanciful and just here for educational purposes. The output sequences associated to the nodes are simplified using special characters (in real, they are sequences of character names belonging to the charsets described before). The blue nodes are
non effective nodes, the violet nodes are
effective nodes.

We will try to transcribe the word
TANIQUETIL. Here are the steps of the algorithm:
|
Remains | Output |
Explanation |
| 1 |
TANIQUETIL |
|
A T node is accessible from the top of the tree. We cannot go further. This T node is effective, so we dump its output sequence # |
| 2 |
ANIQUETIL | # |
A A node is accessible. We can go further: a N node follows. We advance, but cannot go further. Fortunately, the N node we’re on is effective, so we can dump its sequence + |
| 3 |
IQUETIL | #+ |
A I node is accessible. We cannot go further. The node we are on is effective, so we dump its output sequence -
|
| 4 |
QUETIL | #+- |
Following the Q, U, E path, we are on an effective node so we can dump the associated sequence &"
|
| 5 |
TIL | #+-&" |
Following the T, I path, we are on an effective node so we can dump the associated sequence #' |
| 6 |
L | #+-&"#' |
An effective L node is accessible, we dump its associated sequence §
|
| 7 |
|
#+-&"#'§ |
We’re done ! |
You can test your understanding of the algorithm on the following words:
ANAR,
TINTALLE,
ATANATARI (respective solutions are:
+☠@,
#'☠#☠§§?,
*☠*@- – remember, when the transcriber cannot find an effective path, it eats one letter and dumps ☠).
Glǽmscribe’s mode programming language
The modes used by Glǽmscribe’s engine are coded with a custom programming language, which focuses on the very purpose of transcription and tries to avoid unnecessary matters and verbosity. The mode programmation itself is wrapped inside a structured file written in GlaeML, a generic markup language elaborated for Glǽmscribe.
The GlaeML markup language
The GlaeML markup language is a very simple and open markup language inspired by XML, LateX and alike. It describes a tree of nodes with the following structure constraints:
- A node is either an element node or a text node.
- Each element node can have zero or more child nodes.
- Each element node can have a list of zero or more unnamed arguments.
- The root node is not accessible for customization, and represents the GlaeML file itself.
The general syntax is the following one:
Et voilà!
Glǽmscribe’s charset file format
Glǽmscribe charset files are written in GlaeML with the following structure:
That structure is pretty simple, each GlaeML element is a char; the first arg is a hexadecimal code corresponding to the position in the Unicode table; the other arguments are the names we want to give to these characters. In the above example we are giving their original names to the tengwar appearing in Dan Smith tengwar fonts. The rules for declaring characters are the following:
- You can use any number of names a character, as long as it does not clash with another one.
- You can use ? as a name to have the character in your set but just have it ignored.
- Names should be written with upper case letters, digits, or underscore.
Virtual Characters : Diacritics & Ligatures
Additionally, a new feature has been introduced in Glǽmscribe to simplify the use of diacritic variants (mainly for tehtar placement) and ligatures, which is called virtual chars. A virtual char is a character that does not exist in a charset BUT may be described as the resolving of its different variants. For example, in all tengwar fonts designed on the original concept imagined by Dan Smith, tehtar exist as multiple variants (often 4 variants, with an increasing offset towards the left, that permits to cover most associations with the leading tengwa). Let's take an example :
Here we define a virtual character (the diacritic for the A vowel in tengwar writing), and describe the cases where we should use the variants A_TEHTA_XS, A_TEHTA_S, A_TEHTA_L, and A_TEHTA_XL, by giving a list of preceding characters that will trigger the variant. This virtual char can be used in the mode rule programmation instead of its variants, making the mode far more readable, easier to write, and generic. Virtual chars are resolved during the /resolve_virtuals post processor operation - do not forget to call it in your postprocessor section. The trigger state for a virtual char is reseted at each new word.
The same mechanism is available for ligatures ; the only difference is that the 'reversed' attribute should be added to the virtual char because in that case, the ligatured character is also the trigger. This example comes from the charset for the Tengwar Annatar cursive font where there are two variants for LAMBE (as visible on Tolkien's Ring Inscription), one with ligature and one without.
The virtual char mechanism is here to compensate the lack of features on the vast majority of fonts ; in modern formats (such as OpenType), the font itself could be able to handle ligatures and the placement of diacritics, on the condition that the font designer would have devised it.
Another feature is the ability to declare, in the charset, a "sequence" character. When this declared character is present in the token list at the very end of the transcription, it will be replaced by a full defined sequence. For example :
will allow you to use a virtual character named AHA_TINCO, which, in fact will be replaced by the sequence of three characters AHA ZWJ TINCO after all steps of the transcription have been done. This can be useful when you need to adjust compatibility between charsets for fonts that do not behave exactly the same way.
Glǽmscribe’s mode file format
Glǽmscribe mode files are written in GlaeML with the following structure:
Let us just explain all elements present in the file:
-
language name: The name of the language you are writing your mode for.
-
writing name: The name of the writing you are writing your mode for.
-
mode name: The long name for your mode.
-
version version: The version of your mode.
-
authors name: The author(s) of your mode (probably your own name).
-
charset charset_name (true|false): Declares the charset charset_name to be compatible with this mode. The second argument indicates that this charset should be the default one when no charset is given during transcription. A mode may have multiple charset definitions.
-
preprocessor : Declares the preprocessor rules.
-
processor : Declares the processor rules.
-
postprocessor : Declares the postprocessor rules.
Preprocessor implementation
The preprocessor is implemented as a series of rules applied sequentially (in the order they are declared). Let us start by a small example taken from the Quenya classical mode:
The flow is pretty simple here: we start by putting the user input downcase (using the downcase directive), then replace all variants of the long vowels with a unique variant using regular expressions (using the rxsubstitute directive) and then disambiguate qu by replacing it by q.
The possible preprocessor directives currently implemented are the following ones:
-
downcase: Put the whole input downcase.
-
substitute str1 str2: Replaces all occurrences of str1 to str2.
-
rxsubstitute rx rep: Replaces all occurrences of the regular expression rx by rep. For a quick guide to regular expression syntax and testing, see rubular. You may do captures, and the syntax for the captured elements in the rep argument is \1, \2, etc. for the nth captured element. Remember that all arguments of GlaeML should be in the UNIX shell format so all \ should be escaped with another \ as well as other special characters. (Thus, a rule that replaces all words beginning by k+vowel by c+vowel would be written \rxsubstitute "\\bk([aeouy])" "c\\1": \b is escaped as well as \1).
-
elvish_numbers base (true|false): Performs a preprocessing on numbers by changing the base (could be any number from 2 to 16) and optionally reverse the digit order when the second argument is true. If the base is greater than 10, upper digits will use upcase A, B, C, and so on.
-
up_down_tehta vowel_list consonant_list : A very special preprocessing rule used for modes that will use tehtar over and below tengwar at the same time. It will disambiguate the consonant-vowel-consonant pattern by breaking it into a consonant-fakeemptyvowel-vowel-consonant pattern. The vowel_list argument is the list of possible vowels separated by comas, the consonant_list is the list of possible consonants separated by comas. See the Old English Mercian mode for a use case (the only one actually!).
Postprocessor implementation
The postprocessor works exactly the same way as the preprocessor. There is only one use case for the moment: reversing the order of characters for right-to-left sarati modes. Here is a basic example:
The possible postprocessor directives currently implemented are the following ones:
-
reverse: Reverse the character order of the input.
-
resolve_virtuals: Will apply the rules to transform virtual chars (diacritics and ligatures) into real chars, depending on their context (see Virtual Chars).
This part is the most important because we are going to learn how to write the rules that build the transcription tree of the processor.
The first thing to know is that rules should be grouped into group of rules; this is the role of the processor rules directive.
-
rules group_name: Create a group of rules.
The aim of grouping rules together is to indicate to the processor how to split the input into words. For example, a text could be made of letters, punctuation characters, digits, and so on. The processor needs to know how to split the sequences of characters to decide what is a word and what is not a word. Thus, the processor will analyse all rules of a group, extract the input character set used in these rules, and use these character sets to split the user input text. That is why it should be noticed that input character sets should not overlap between rule groups. Typical groups used in the implemented modes are litteral (for letters), punctuation (for punctuation), and numeral (for numbers). To summarize, here is the syntax of these rule groups:
See the existing modes for complete examples.
The rule groups are here to contain rules. The general rule syntax is the following one:
- input_sheaf_chain --> output_sheaf_chain
We will come back just after on what sheaves are, but we can already give an exemple of a serie of simple rules. (Please note that for pedagogical reasons, this example does not use virtual chars).
This example will generate the following transcription tree:
Using that tree, the word taniqetil will be transcribed as TINCO A_TEHTA_S NUMEN I_TEHTA_XL QUESSE E_TEHTA_S TINCO I_TEHTA_S LAMBE.
OK. Now what is a sheaf?
A sheaf is either a chain of fragments, or a beam of chain of fragments that will be treated the same way in the rule, in parallel. The general syntaxes for sheaves are the following ones. For a non-linkable sheaf :
And for a
linkable sheaf :
- [fragments1 * fragments2 * fragments3 * ... ]
The role of sheaves is to factorize, parallelize simple rules that have the same behavior into one single global rule. Let us take an example, from Quenya. We would like to write a rule that transcribes ta, and another one that transcribes pa. With sheaves, we will do it like this:
As you can see, the left member of the rule uses the user input charset, the right member uses exclusively the names of characters declared in the linked mode charset files. The last rule will parallelize by linking the linkable sheaves, and be equivalent to the following smaller atomic rules:
Imagine now that we would like to write the rules for ta, ti, to, pa, pi and po. With sheaves, we will do it like this:
The last rule will parallelize by linking the linkable sheaves, and be equivalent to the following smaller atomic rules:
Now that we have seen the behavior of sheaves, let us have a look at the behaviour of the atomic members of sheaves, fragments. Fragments can be simple letters like in the examples above (ta, pi, ...). But they can also be a little more complex and composed by a sequence of equivalences. Here is a syntax for an equivalence:
- (atomic_sequence1, atomic_sequence2, atomic_sequence3)
This syntax indicates that we want atomic_sequence1, atomic_sequence2 and atomic_sequence3 to be treated the same way. Let us have an example:
It will actually be equivalent to the following atomic rules:
Used in conjunction with sheaves, we could complete our single-rule example like this:
Which would be equivalent to writing all these simple atomic rules:
Sheaf chain prototype homogeneity
One important rule when writing modes is to respect the principle of sheaf chain prototype homogeneity. Since we are building parallel rules from single complex rules, there must be a kind of matching to respect between the left sheaf chain and the right sheaf chain of a rule.
This matching is done by comparing the prototypes of the two sheaf chains : they should be equal. The prototype is calculated from the number of fragment groups contained in the linkable sheaves of the chain. For example, the following sheaf chain:
will have a 4x3 prototype, because the first linkable sheaf has 4 fragments and the second one has 3 fragments.
One important thing to note is that non-linkable sheaves are considered constant and ignored in the calculation of the prototype. Here is a list of examples of prototype calculations:
Having that mecanism makes it possible to have various constant elements at different places in both the left and right sheaf chains, as long as prototypes match. The prototype homogeneity guarantees a coherent parallel iteration of the left and right chains. To conclude with this, let us have a few examples of rules:
What if a rule needs to have an order modification between its input and output? Take the example of tengwar modes where in the latin alphabet the vowels are written after the consonant they modify, but in tengwar, the tehta representing a vowel will be put on the consonant tengwa that follows. The Sindarin classical mode works that way. To do this, the general syntax to indicate how you want to associate the linkable input sheaves to the linkable output sheaves is the following one:
- isheaf1 isheaf2 isheaf3 ... --> permut1, permut2, permut3, ... --> osheaf1 osheaf2 osheaf3 ...
Here is a concrete example:
The given sequence (here 2, 1) is the list of output sheaves to which we associate the input sheaves. In our example the first input sheaf is associated to the second output sheaf, and the second input sheaf is associated to the first output sheaf. This would be equivalent to the following atomic rules:
Of course, we could imagine a more complex (here fanciful) exemple. E.g.
That would be equivalent to write the following atomic rules:
For applied examples, see the West Saxon mode, which has especially complex rules, with mixed linkable and non-linkable sheaves.
All these concepts may be quite powerful, but could become very quickly too long, complex, almost unreadable syntaxes. Moreover, as your mode is growing complete, quite quickly you will have to write again and again the same kind of sheaves, which can be quite fastidious.
To avoid all these problems Glǽmscribe offers a very powerful tool: variables. The behavior of variables is quite like defines in the C language ; they allow you to replace a symbol with another text at pre-compilation time. The syntax for declaring a variable is the following one:
- {VAR_NAME} === Anything you want the variable to be replaced with
Then you just have to use the following syntax in a rule to have the variable being replaced:
Please note that variable names should only use upper case letters, underscore and digits . Let us have a few examples:
Or more complex, use them for sheaves:
Even more complex, here we split our sheaves in case we need to use them in a modular way:
Pointer (dynamic) variables
There are natural cases where you will find that variables are not behaving the way they should : standard variables declared with === will be evaluated and replaced at variable declaration time. There are some cases where you would like your variables to be evaluated and replaced at rule definition time. Let's take an example :
The first rule will transform tt into TINCO TINCO but the second one will transform pp into TINCO TINCO too. This is probably not what you want, you'd rather expect the {DOUBLE_TEHTA} variable to be dynamic and evaluated at rule definition time. To perform that behaviour, the right syntax is :
That way, tt will be transcribed into TINCO TINCO and pp into PARMA PARMA
The {NULL} variable is a special variable which replacement string is empty. There are a lot of use cases, an obvious one is the following:
Macros are a convenient way to avoid repeating complex flows, especially when a lot options are involved. A macro is a bit like a function, but with some restrictions. Two operators are involved : macro to define a macro, and deploy to 'call' the macro. Glǽmscribe uses macros the following way : it will memorize the macro code source on definition, and replace a call to deploy by the macro's code source. It is just as simple as that, but then there are caveats. You should be cautious of the variable names you use in your macros and as arguments for your macros, since they will 'leak' out of the scope of the macro, the macro being deployed 'as is' within the source code of your mode file. The general syntax is :
And an example of a simple macro :
The last tool available in Glǽmscribe to make your mode shiny are options and conditions. Imagine that you want your mode to have multiple options, different behaviors that you want to propose to the user of your mode. For example, in a Quenya mode, you could offer an option to treat differently the Latin r by either using both tengwar óre and rómen, or just always using the tengwa rómen. To define options for your mode, the syntax is the following.
For Boolean options:
-
\option option_name (true | false)
And for multiple value options:
-
\beg option option_name default_value_name
\value value_name_1 value_1
\value value_name_2 value_2
\end
This is an example of application:
These options can be used in two places. The first one is in the \if \elsif \else \endif flow. This flow can either be used in pre/postprocessors or in the processor. The syntax is:
-
\if condition1
rules
...
\elsif condition2
rules
...
\elsif condition3
rules
...
\else
rules
...
\endif
The conditions may use comparators and Boolean operators (>=, <=, >, <, ==, !=, ||, &&, !) or even integer operators (+, -, *, /), parentheses, option names and value names. As an illustration, with the precedent example, one could write :
The other place where you can use conditions are in the pre/postprocessor directive arguments, using the syntax:
One example of application is for numbers in the elvish modes:
The underscore _ character can be used in rules to indicate beginning or ending of words.
Changing the output space
By default, the transcriptor outputs a space character for an input space character. You can change that behaviour by redefining the output space sequence in the mode options.
- \outspace outspace_sequence
A small example, use three big cirth spaces for one normal space:
Dis-ambiguation and phonetization
Although you may do your best in conceiving your mode, there are some languages and cases where there is no way for your mode to take the right decision for dis-ambiguating an input sequence. These are a few tracks you can follow to handle such cases :
- Glǽmscribe defines for all modes a special character, the word breaker character : |. This character will split the input into parts so that it introduces a boundary on its left and right. Thus, for the old english word un|cúðe, the rule for the cluster nc will be ignored and the two parts un and cúðe will be treated separately.
-
If you have a very special word to translate, you still can add its transcription as a complete, independant rule.
-
And finally, you can think about creating a phonetization system for your mode, so that the input is pre-normalized by the user. Such phonetizations are (more or less) already present in the way elvish languages are rendered in Tolkien works ; we also did that kind of work for other modes (for example, see the Old English modes, where we have sometimes extended standard phonetization norms).
Using Glǽmscribe’s mode IDE
To help developing Glǽmscribe modes, it is advised to use
Glǽmscribe’s mode IDE, a tool that offers the ability to edit your charset files, mode files, and test and debug their behavior in real time.
Since Glǽmscribe’s mode IDE is completely written with HTML5 technologies, some differences may appear in its behaviour between web browsers. Mainly, these differences are linked to keyboard shortcut behaviour that may parasit your editing comfort. Also, Glǽmscribe’s IDE has a feature that prevents accidental closing of the editor, but it does not work on every browser.
We advise to preferably use Firefox or Chrome.
Interface layout presentation
The editor UI is composed of various widgets, as summarized on this image :
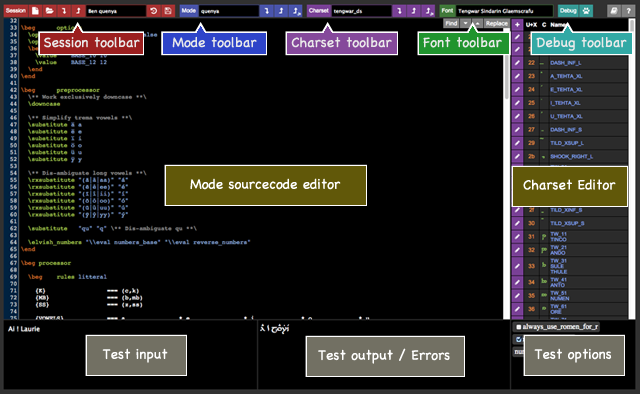
-
Session toolbar: For managing sessions (new, open, import, export, delete, save / commit, open commit, delete commit).
-
Mode toolbar: For managing the current session’s mode (name, import, export, export to js).
-
Charset toolbar: For managing the current session’s charset (name, import, export, export to js).
-
Debug toolbar: Opens the visual debugger.
-
Mode sourcecode editor: Advanced text editor for the sourcecode of the current session’s mode.
-
Charset editor: For editing the current session’s charset.
-
Test input: The input text to transcribe.
-
Test output / errors: Displays the transcriptor output or errors if it has failed.
-
Options: Small widgets for testing the options of your mode (if it has some).
Sessions and local storage
The session toolbar helps you to manage your sessions. Sessions are entities that contain all pieces of information about your day-to-day work on a mode or a charset (to make it short, all elements of the user interface, like mode name, charset name, mode content, charset content, text to transcribe, and so on are saved in the session). To save a Session, you will in fact commit it, which means that you will save the current version of the session. All precedent commits of the session are kept and made accessible to you so that you can revert or refere to them if you wish too.
The session data is stored
in the local storage of your web browser.
Local storage is a feature that came with HTML5 and allows to save and retrieve persistent information from a web browser in the context of a web page. The choice of using local storage for
Glǽmscribe’s IDE comes from a few constraints, the main one being that
saving a custom edited file from a web browser is something wich is quite complex and unreliable thing to implement if you do not use technologies like flash. Falling back to
downloading a custom edited file is not more satisfactory since each browser has its set of options for naming, chosing path, and so on, and that makes the working task horrible if you have to save often. So we discharge ourselves from that part and report it to the
export tasks instead, which we do far less often.
Note that no information about your work is exchanged with the server, and Glǽmscribe’s IDE can run completely locally if you download it from the GitHub repository.
When editing, it is important to set correctly the font that will be used to give feedback on the translation, but also in the charset editor.
The font should be installed on your system and you should type correctly the name of the font in the input located in the font toolbar (if typed correctly, the C column of the charset editor should use it). Like Tengwar Sindarin, Tengwar Eldamar, Tengwar Eldamar Glaemscrafu and so on.
Simple modes will use classical Tolkienian fonts. If you want to learn more about the versions of the fonts that are used by the Glǽmscribe modes presented on the
official Glǽmscribe page and use them for your own modes, you can visit our page
About transcriptions and typefaces that present the problematics linked to fonts and the solutions we chose to solve them.
Editing a mode and a charset
One thing you would probably do when you start making your own mode is importing a .glaem official mode to see how it is written. If doing so, do not forget to import a compatible charset. The compatible charset names are defined in the mode sourcecode itself (under the charsets section). The charset name given in the charset name input field should always match one of the charsets given in the mode sourcecode or the transcription will fail with an error telling that the transcription charset was not found.
Editing the mode sourcecode is pretty straightforward, just follow the rules described in the
Mode Programming Language section.
The charset editor will let you have an overview of the characters that are present in the charset, with their associated names that can be used in the mode programmation. The charset editor is currently being rethought and rewritten due to the introduction of virtual chars and is only in read-only mode, sorry! Still, charset files are quite simple and can be edited with a simple text editor.
Glǽmscribe’s IDE comes with a visual debugger that will help you understand the behavior of your mode. This is a screenshot of a debugging session on the Quenya mode:
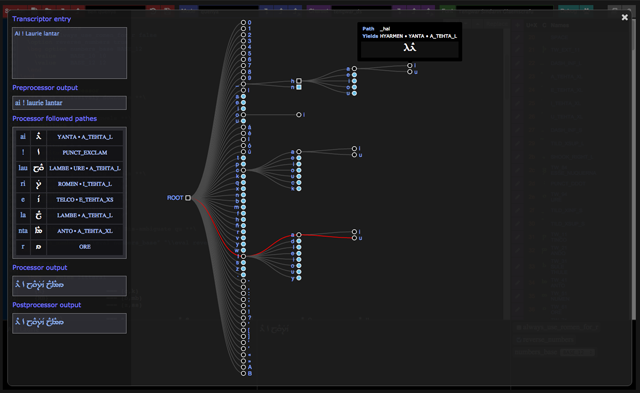
The left part of the debugger displays the results of the various steps involved in the transcription of the text given as input (after preprocessing, processing and postprocessing), but also gives the decomposition of the paths followed by the transcriptor when exploring the transcription tree.
The tree view itself gives a representation of the transcription tree. Effective nodes are noted by circles, non effective nodes by squares:
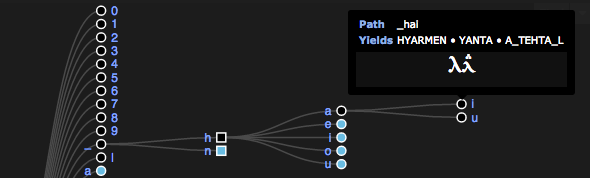
You can hover a node to get an overview of the path leading to the node, and how it gets transcribed.
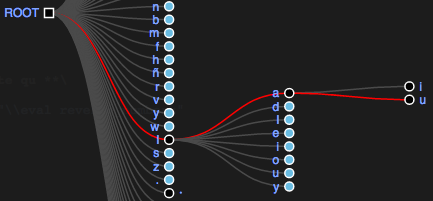
You can also click on the decomposition of a transcription in the left part of the debugger to highlight the corresponding path in the tree:


 ✵
✵
 Creating and editing Glǽmscribe modes